

Introduction
The brand new Disconnected Period in AWS IoT System Defender now supplies System Defender Detect clients the flexibility to watch Web of Issues (IoT) gadget’s connectivity standing and period of disconnection. Till now, clients needed to depend on customized self-managed options, utilizing AWS Lambda or Amazon CloudWatch, and Join/Disconnect occasion messages from AWS IoT Core occasion messages lifecycle occasion messages.
With the brand new Disconnected Period metric, clients can react to a tool disconnection based mostly on a specified disconnection interval threshold configured in AWS IoT System Defender. Monitoring this metric may also help you perceive the well being of your fleet. Units which were disconnected for lengthy intervals of time might have turn out to be susceptible as a consequence of not receiving updates and pose a safety threat, or now not work correctly when counting on different techniques which have since advanced. Prospects may also apply the Disconnect Period to beat many gadget fleet administration challenges, equivalent to transferring a tool, that has been disconnect for an extended time period, to a particular group of decommissioned or misplaced gadgets. In functions the place distant property hardly ever join, you’ll be able to apply this metric to outline whether or not a upkeep workforce must be deployed to the placement or not. AWS IoT System Defender can be utilized along with AWS IoT System administration, the place you need to use Fleet indexing to create queries that report which gadgets are disconnect and for the way lengthy. By figuring out the disconnected gadgets you’ll be able to then outline Dynamic teams or begin Mitigation actions, addressing fleet administration necessities, in addition to safety compliance.
On this weblog publish, you’ll discover ways to configure a Safety profile in AWS IoT System Defender utilizing the brand new Disconnect Period metric, and ship a message to Amazon Easy Notification Service (SNS) when a violation is detected. Additionally, you will use Amazon Easy Queue Service (SQS) to obtain and visualize the message from the SNS subject. Along with that, you’ll discover ways to question for gadgets which can be in violation utilizing Fleet indexing and the right way to create Dynamic teams for these gadgets.
Overview
The structure diagram beneath, illustrates the movement of messages of the pattern resolution outlined on this weblog publish:
1- The Simulated gadget connects after which disconnects.
2- After 5 minutes, the disconnected gadget will elevate an anomalous conduct alert on the Safety Profile.
3- The alert notification service will publish a message to the outlined SNS subject.
4- The SQS queue is subscribed to the SNS subject and it’ll obtain the message.
5- Utilizing an advance fleet indexing search, you’ll return the issues beneath violation within the chosen safety profile.
6- From the search, you’ll then outline a Dynamic issues group which is able to mechanically index and group issues matching the search standards.
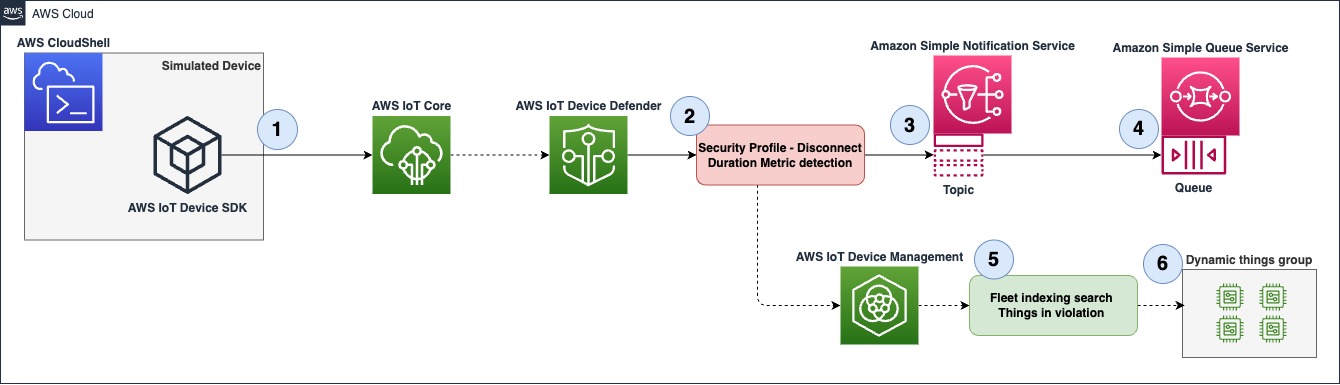
Determine 1 – Overview diagram
Conditions
- An AWS account with entry and permission to carry out motion on AWS IoT Core, AWS IoT System Defender and AWS IoT System Administration.
- AWS Id and Entry administration (IAM) permission to create and assign roles in AWS IoT Core.
- AWS Id and Entry administration (IAM) permission to create SNS matters and SQS queues.
- Entry to AWS CloudShell and primary information on Linux and AWS Command Line Interface (AWS CLI).
Walkthrough
Making a SNS subject and a SQS subscription
Right here you’ll create the SNS subject and the SQS subscription for the subject the place the violation notification will get printed to.
1- Go to SNS, then navigate to the left aspect menu, Choose Matters then create a subject.
- Choose Commonplace.
- Title – Disconnected_things_notification.
- Go away all different configurations as default and click on Create subject. Word: You’ll use the default entry coverage that solely permits the subject proprietor to subscribe to it.
2- Go to SQS, then navigate to the left aspect menu, Choose Queues then create a queue.
- Choose Commonplace.
- Title – Disconnect_thing_notification_queue.
- Go away all the opposite configurations as default, then click on Create queue. Word: You’ll use the default entry coverage that solely permits messages from the queue proprietor.
Within the subsequent menu navigate all the way down to SNS subscription, then click on on Subscribe to Amazon SNS subject, selected Disconnected_things_notification, then save.
Making a safety profile
Subsequent you’ll create a Safety profile which defines what is taken into account an anomalous conduct. You possibly can mix AWS IoT System Defender metrics, customized metrics and dimensions with the intention to create an acceptable detection mannequin based mostly in your use case. Within the instance beneath, we’ll solely make the most of the brand new Disconnected Period metric, to study extra about how metrics may be mixed successfully, learn the Safety use circumstances section within the documentation.
1- Go to AWS IoT Core, then navigate to the left aspect menu, Choose Safety→ Detect→ Safety Profiles, Now click on on Create Safety Profile and choose Create Rule-based anomaly Detect profile.
2- Within the Specify safety profile properties menu configure the next:
- Title – Disconnect_duration_5m
- Goal – A goal group, you’ll be able to choose a gaggle or a number of, on this instance you’ll be focusing on all registered issues.
- Function – Create a brand new function.
- Set SNS configuration, choose the beforehand created subject, Disconnected_things_notification.
- Within the SNS Function, choose create a brand new function.
- Click on Subsequent.
3- Within the Outline metric behaviors menu do the next:
- Below Cloud-side metricsSearch and choose Disconnect Period beneath Cloud-side metrics.
- Metric Habits – Choose Alert me.
- Habits title – Disconnect_duration_5m.
- Within the logic fields, use Disconnect_duration is larger than or equal – 5 minutes, because of this any gadget which is disconnected for five minutes or extra will likely be thought-about anomalous.
- Click on Subsequent.
- Assessment your configuration and click on on Create.
The determine beneath is an instance of how your Metric conduct configuration will appear to be.
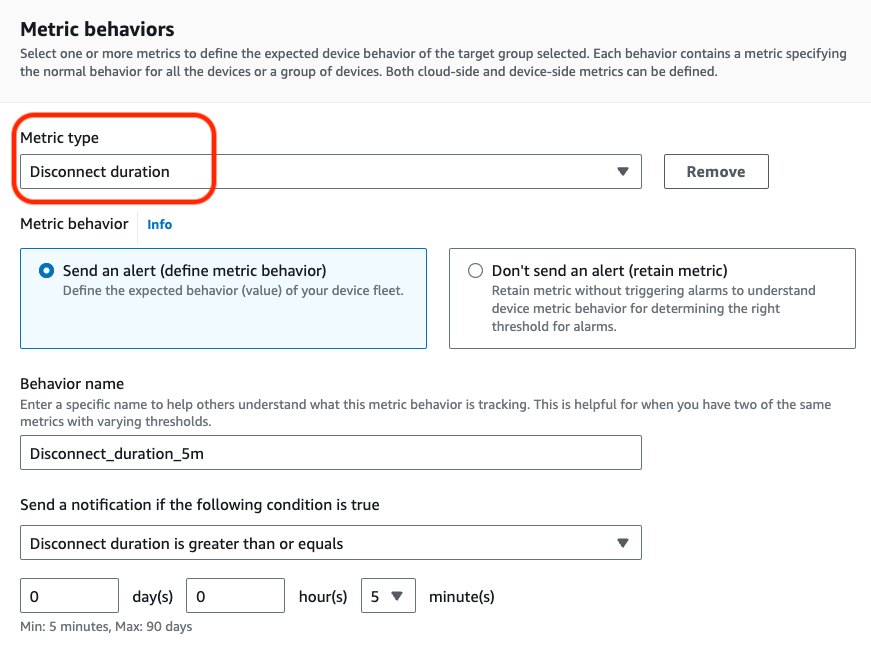
Determine 2 – Configure metric conduct menu
Simulating an anomalous gadget
1- First you’ll create an AWS IoT Core factor that will likely be used to simulate a tool that has been disconnected for greater than 5 minutes and detected as anomalous by your safety profile.
Go to AWS IoT Core, then navigate to the left aspect menu, Choose Handle→ All gadgets→ Issues. Now click on on Create issues.
- Choose Create a single factor and click on Subsequent.
- Title your factor test_thing, depart all the opposite configurations as default, then click on Subsequent.
- Choose Auto-generate a brand new certificates, then click on Subsequent.
- You may be prompted with the Insurance policies menu, in the event you don’t have a coverage, create one with the next configuration:
{
 "Model": "2012-10-17",
 "Assertion": [
 {
 "Effect": "Allow",
 "Action": "iot:Connect",
 "Resource": "arn:aws:iot:<your-region>;:<your-account-id>:client/test_thing"
 }
 ]
}- Navigate again to the earlier menu, refresh and fix the created coverage, then Create factor. Obtain and save the non-public key, public key and gadget certificates and click on accomplished, you’ll use these information on the next steps.
2- On this step you’ll be utilizing AWS CloudShell to put in and run a pattern utilizing the AWS IoT System SDK v2 for Python , nevertheless be happy to make use of another AWS IoT System SDK and your most well-liked IDE platform.
Go to AWS CloudShell, as soon as the CLI has initialize, execute the next instructions:
python3 -m pip set up awsiotsdk
git clone https://github.com/aws/aws-iot-device-sdk-python-v2.git
3- Subsequent, add the non-public key and gadget certificates that you just downloaded when the AWS IoT core factor was created.
- On the highest proper, click on on the Actions menu, choose add information, choose the important thing file and add it, then repeat with the certificates file. Word: the information are uploaded and positioned into the /house/cloudshell-user listing.
4 – Now you’ll begin the simulation by operating one of many pattern Python scripts.
From /house/cloudshell-user execute the next instructions:
aws iot describe-endpoint --endpoint-type iot:Information-ATSPay attention to the endpoint worth, you want it within the subsequent step.
python3 ~/aws-iot-device-sdk-python-v2/samples/basic_connect.py --endpoint <your-iot-core-ats-endpoint> --cert <downloaded-cert-path> --key <downloaded-key-path> --client_id test_thingIf the pattern executes efficiently you will notice the next outputs:
Connecting to <your-iot-enpoint-here>-ats.iot.<your-region>.amazonaws.com with shopper ID ‘test_thing’…
Related!
Disconnecting…
Disconnected!
Confirming violation
After operating the simulation, you’ll be able to examine if the violation has been detected by your safety profile. Word that AWS IoT System Defender safety profiles might take a couple of minutes to publish a violation.
1- Now navigate to SQS, Choose Queues, and the queue you created within the earlier steps. Navigate to the highest proper menu and choose Ship and obtain messages, then on the Obtain message menu, Ballot for messages. You should have a message obtainable, and the physique will look just like the picture beneath, by utilizing this methodology you’ll be able to combine AWS IoT System Defender violation alerts with a number of AWS Companies.
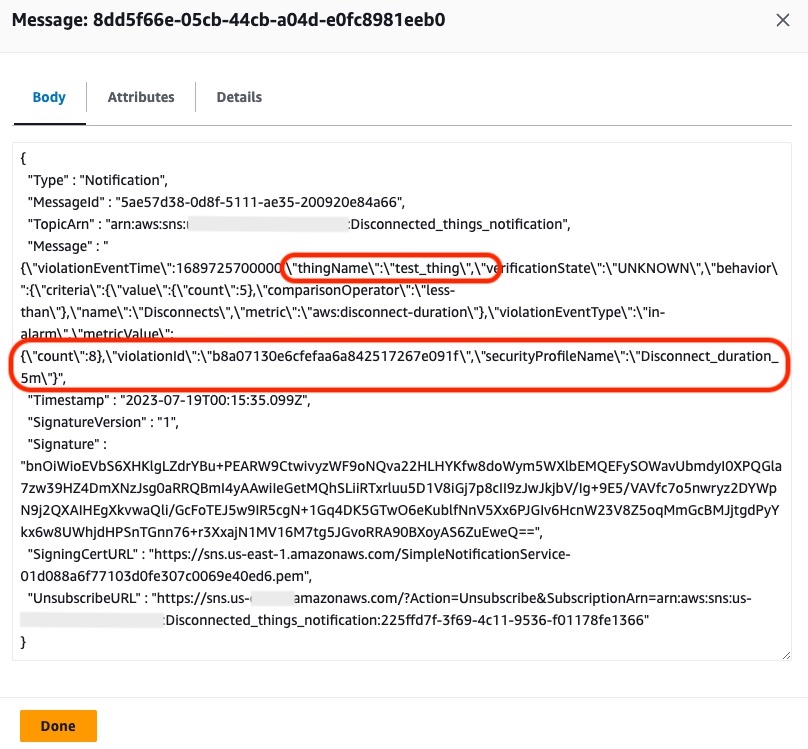
Determine 3- Violation notification message
2- You may also visualize for the way lengthy an anomalous gadget has been disconnected. Go to AWS IoT Core, then navigate to the left aspect menu, Choose Handle→ All gadgets → Issues.
- Choose the factor you created within the earlier steps, test_thing.
- Navigate to Defender metrics beneath Metric, choose Disconnect Period.
You will notice an identical chart as beneath, indicating when and for the way lengthy your gadget has been disconnected. You need to use the instructions from above to attach and disconnect your simulated gadget once more and observe how the reported metrics change. Remember the disconnect metric experiences in increments of 5 minutes, and isn’t up to date in actual time
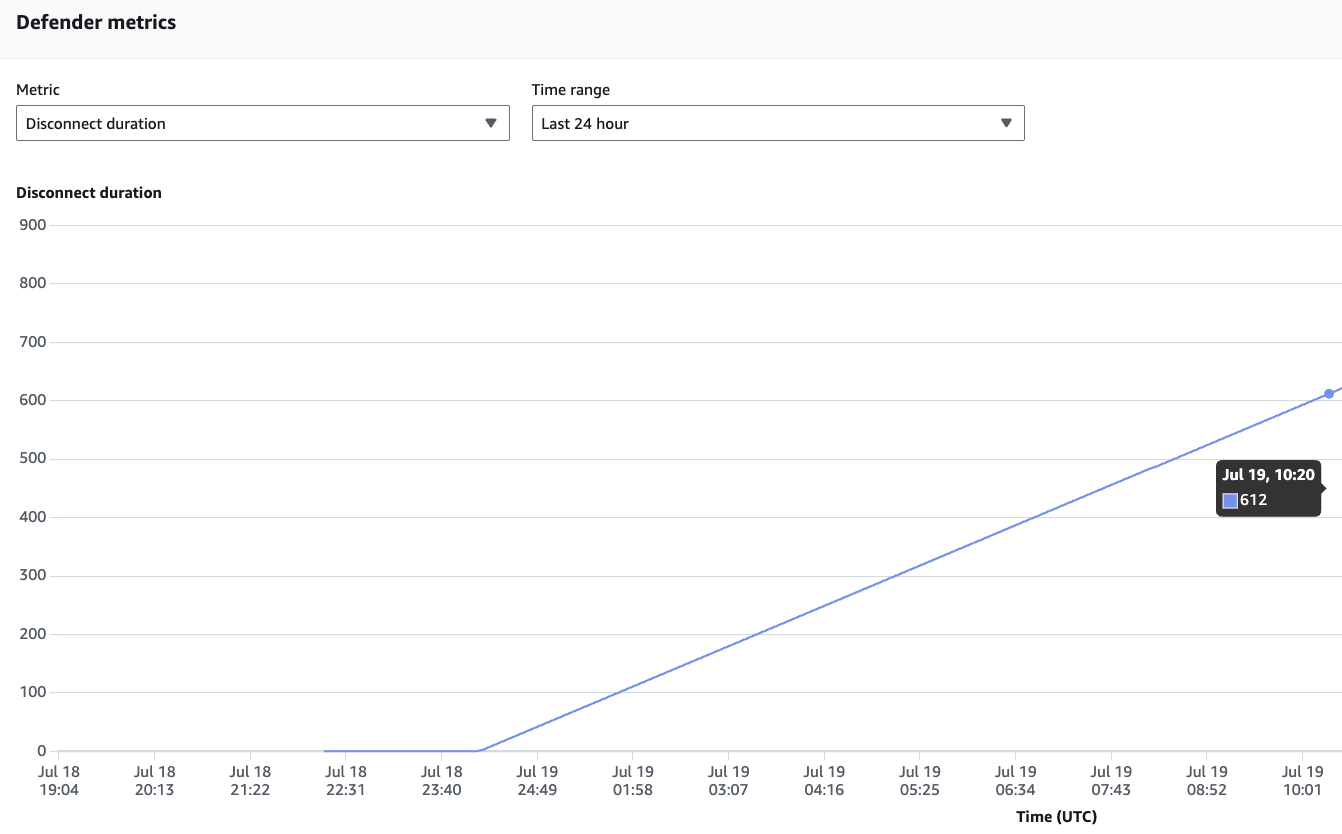
Determine 4 – Defender metric – disconnected period
The Disconnect period metric can also be obtainable by means of the list-metrics-values AWS CLI command. You need to use the next command to question the metric:
STARTTIME=$(date -u +%Y-%m-%dTpercentH:%M:%SZ -d "5 minutes in the past")
ENDTIME=$(date -u +%Y-%m-%dTpercentH:%M:%SZ)
aws iot list-metric-values --thing-name test_thing --start-time $STARTTIME --end-time $ENDTIME --metric-name aws:disconnect-duration
The command will return an output with the newest metric replace, just like the instance beneath:
{
    "metricDatumList": [
        {
            "timestamp": "2023-07-19T14:30:00+00:00",
            "value": {
                "count": 10
            }
        }
    ]
}
Looking for gadgets in violation and creating dynamic teams
Earlier than you seek for a tool in violation, that you must be certain Fleet indexing has been enabled for System defender. To examine that, go to AWS IoT Core, then navigate to the left aspect menu, choose Settings, navigate to Fleet indexing, click on on Handle indexing, within the new menu search and choose Add System Defender violations. The Fleet indexing service will begin indexing all values within the background, which could take a couple of minutes.
1- Go to AWS IoT Core, then navigate to the left aspect menu, Choose Handle→ All gadgets→ Issues.
- Click on on Superior search.
- Within the Question search area use the next assertion: deviceDefender.Disconnect_duration_5m.*.inViolation:true
- This question will return all gadgets in violation beneath the Disconnect_duration_5m profile. If you happen to adopted the walkthrough you will notice the your test_thing within the end result checklist, as proven within the determine beneath.
- Now click on on Save question.

Determine 5 – Superior factor search end result
2 – Go to AWS IoT Core, then navigate to the left aspect menu, Choose Handle→ All gadgets →Factor teams , then Create issues group:
- Choose Create dynamic.
- Factor group title – Disconnected_things.
- Below Question, click on on Use saved question, then choose the saved question from the earlier step, deviceDefender.Disconnect_duration_5m.*.inViolation:true .
- Click on on Create factor group.
Inside a couple of seconds you will notice your factor as a part of the group, as proven within the determine beneath. By making use of Dynamic grouping you’ll be able to resolve numerous use circumstances, for instance defining steady Jobs to the Dynamic group will pressure updates to these gadget if they arrive again on-line, ensuring they’re compliant and updated. You may also use Dynamic group for fleet administration duties, for example a tool which were disconnected for greater than 30 days may be deemed misplaced or decommissioned and added to a factor group which now not receives updates or denies join actions.
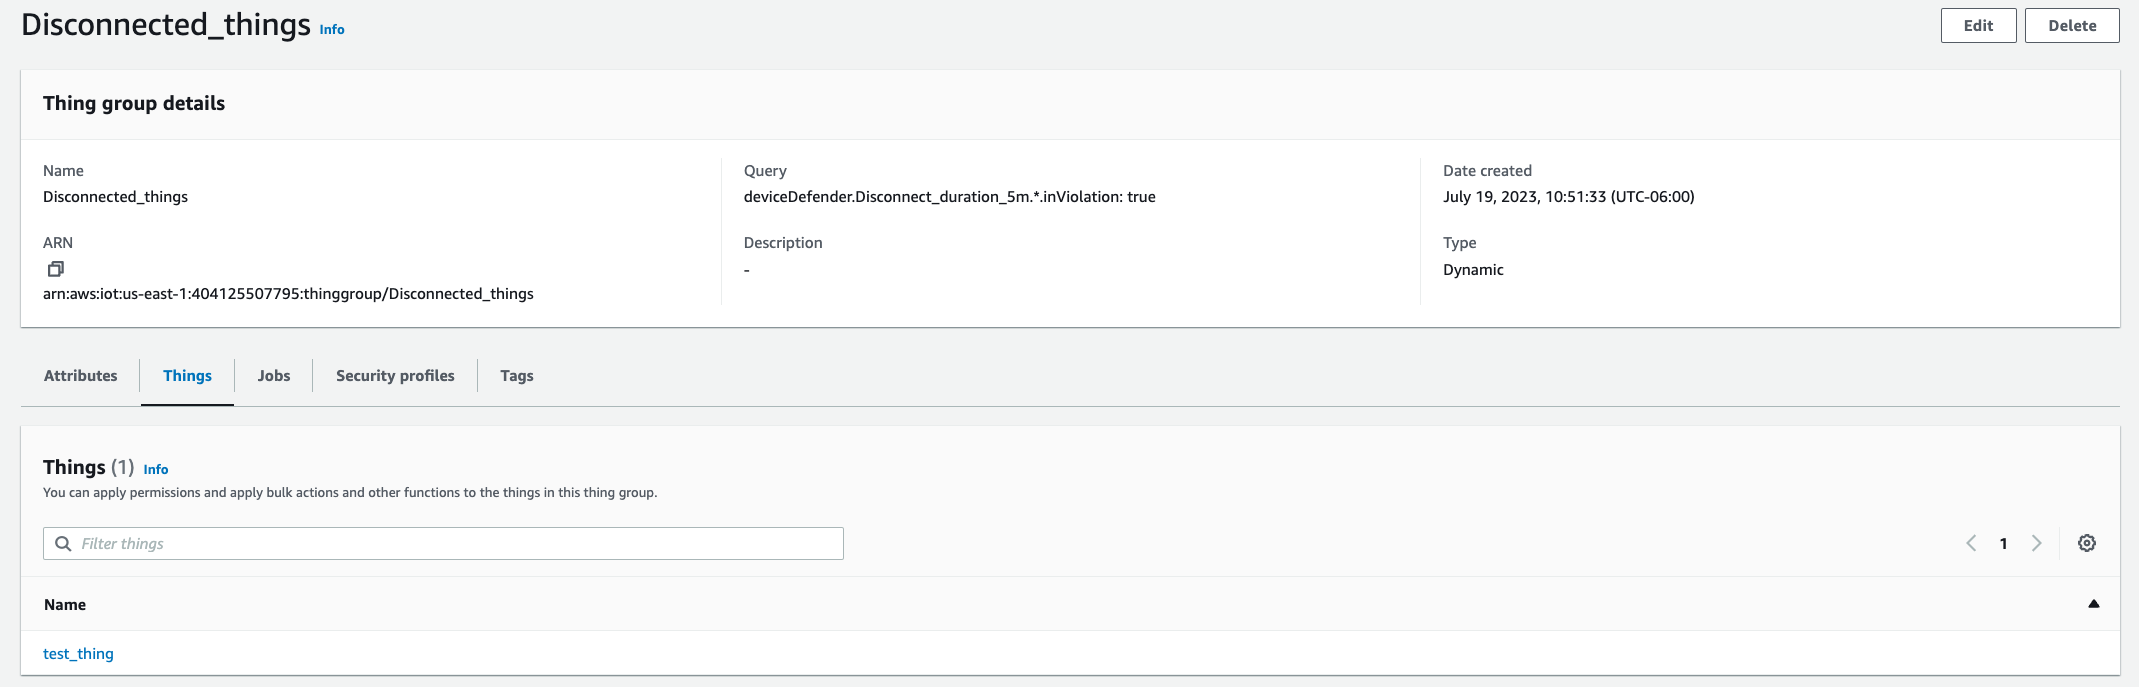
Determine 6 – Dynamic issues group
Clear up
To be able to keep away from incurring price do the next:
- Delete the safety profile Disconnect_duration_5m.
- Delete the test_thing factor and its certificates.
- Delete the Disconnect_things group.
- Flip off System Defender violations in Fleet indexing.
- Delete each the SNS subject and SQS queue created in the course of the walkthrough.
Conclusion
On this publish, you realized the right way to use the brand new AWS IoT System Defender Disconnect period metric to watch gadgets with anomalous disconnection (or disconnect time) behaviors. You additionally realized how this is applicable for safety and gadget administration use circumstances, and by utilizing the safety profile native integration with SNS, you’ll be able to create event-driven actions. Lastly, you used Fleet indexing for search and Dynamic grouping, and realized how one can apply it for computerized fleet actions and updates with Jobs. For extra in depth take a look at creating with AWS IoT System Defender, discuss with this tutorial, Getting began with AWS IoT System Defender.
In regards to the Creator
Yuri Chamarelli is an Amazon Net Companies IoT specialist Answer Architect based mostly out of Denver. As an IoT specialist, he focuses on serving to clients construct with AWS IoT and attain their enterprise outcomes. With a background on Controls engineering and over 10 years of expertise in IT/OT techniques he has helped a number of clients with Industrial transformation and Industrial automation initiatives all through many industries.
 Andre Sacaguti is a Sr. Product Supervisor-Tech at AWS IoT. Andre focuses on constructing services and products that assist gadget makers, automotive producers, and IoT clients from numerous industries to watch and safe their gadgets from edge to cloud. Earlier than AWS, Andre constructed and launched IoT merchandise at T-Cellular and Qualcomm.
