


|
AWS Utility Migration Service simplifies, expedites, and reduces the price of migrating your functions to AWS. It lets you raise and shift many bodily, digital, or cloud servers with out compatibility points, efficiency disruption, or lengthy cutover home windows. You possibly can reduce time-intensive, error-prone handbook processes by automating replication and conversion of your supply servers from bodily, digital, or cloud infrastructure to run natively on AWS through the use of Utility Migration Service for migration. Earlier this yr, we launched main enhancements, similar to a server migration metrics dashboard, import and export, and extra post-launch modernization actions.
Right this moment, I’m happy to announce three main updates to Utility Migration Service. Right here’s the short abstract for every function launch:
- International View – You possibly can handle large-scale migrations throughout a number of accounts. This function gives you each visibility and the power to carry out particular actions on supply servers, apps, and waves in several AWS accounts.
- Import and Export from Native Disk – Now you can use Utility Migration Service to import your supply surroundings stock record to the service from a CSV file in your native disk. You may also export your supply server stock record from the service to a CSV file and obtain it to your native disk. You possibly can proceed leveraging the beforehand launched import and export performance to and from an S3 bucket.
- Extra Submit-launch Actions – On this replace, Utility Migration Service added 4 further predefined post-launch actions. These actions are utilized to your migrated functions while you launch them on AWS.
Let me share how you need to use these options to your migration.
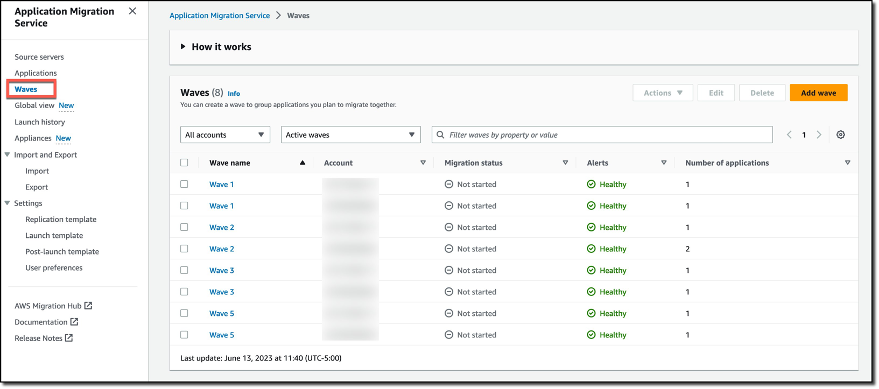
International View
International View gives you the visibility and the power to carry out particular actions on supply servers, functions, and waves in several AWS accounts. International view makes use of AWS Organizations to construction a administration account (which has entry to supply servers in a number of member accounts) and member accounts (which solely have entry to their very own supply servers).
To make use of this function, you might want to have an AWS account during which AWS Utility Migration Service is initialized. This account should be an admin in AWS Organizations or a delegated admin for AWS Utility Migration Service. You possibly can view the International View web page on the Utility Migration Service web page within the AWS Administration Console by choosing International View within the left navigation menu.
You should use the worldwide view function to see supply servers, functions and waves throughout a number of managed accounts and carry out numerous actions, together with:
- Launching check and cutover cases throughout accounts
- Monitoring migration execution progress throughout accounts
The primary International View web page gives an summary of your account and this data modifications relying on whether or not you could have a administration account or a member account.
In a administration account, you possibly can see the AWS organizations permissions, the depend of linked accounts, and the whole variety of supply servers, functions, and waves underneath Account data. The Linked accounts part shows the related data to your linked accounts. It exhibits all of the linked accounts this account has entry to, together with the account you’re logged into (the administration account) and the member accounts which might be linked to it. If the administration account has entry to 2 further member accounts, the Linked accounts part will present three accounts. It’s the whole variety of accounts which might be seen by way of this administration account (together with itself). For member accounts, this web page solely shows the account data that features the AWS organizations permissions and the variety of supply servers, functions, and waves within the particular account.

In your administration account, you possibly can entry and evaluate supply servers, functions and waves inside your account and throughout all member accounts. As a supervisor, you possibly can select between All accounts and My account from the drop-down menu, which lets you change you view of introduced supply servers, functions or waves.
Import and Export from Native Disk
A complete information heart stock types the inspiration of any profitable migration endeavor. This stock encompasses a complete record of servers and functions managed by clients on premises. The stock is categorized into migration waves to facilitate environment friendly migration planning.
Usually, this stock is compiled utilizing discovery instruments or created manually by IT directors. Maybe you preserve your information heart stock in Excel spreadsheets. With Utility Migration Service, we provide seamless help for importing your stock record from a CSV file, which follows a format just like the one utilized by Cloud Migration Manufacturing facility.
Within the earlier launch, Utility Migration Service supported the choice to import a file from Amazon S3 and export a file to Amazon S3. On this newest launch, Utility Migration Service helps the choice to import a file from native disk and export a file to native disk. This makes it straightforward so that you can handle giant scale-migrations and ingest your stock of supply servers, functions and waves, together with their attributes similar to EC2 occasion kind, subnet and tags. These attributes are the parameters used to populate the EC2 launch template.

To begin utilizing the import function, you might want to establish your servers and software stock. You are able to do this manually or utilizing discovery instruments. The subsequent factor you might want to do is obtain the import template, which you’ll be able to entry from the console.

After you obtain the import template, you can begin mapping your stock record onto this template. Whereas mapping your stock, you possibly can group associated servers into functions and waves. You may also carry out configurations, similar to defining Amazon Elastic Compute Cloud (Amazon EC2) launch template settings and specifying tags for every wave.
The next screenshot is an instance of the outcomes of my import template.

On the Utility Migration Service web page within the AWS Administration Console, choose Import on the left-side navigation menu (underneath Import and Export). Below the Import stock tab, choose Import from native disk. Choose Select file and select the native file containing your stock record. Choose Import, and the stock file is imported into Utility Migration Service. When the import course of is full, the small print of the import outcomes seem.
Now, you possibly can view all of your stock contained in the Supply servers, Purposes, and Waves pages on the Utility Migration Service console.
To export your stock to a neighborhood file, choose Export on the left-side navigation menu of the Utility Migration Service web page. Below Export stock tab, select Export to native disk. Specify the title of the file to obtain underneath Vacation spot filename. Select Export, and the stock file downloads to your native disk. Utility Migration Service makes use of an S3 bucket inside your account for the import and export operations, even when utilizing native disk. You have to have the required permissions to carry out this motion. You possibly can modify the exported stock file and reimport it to carry out bulk configuration updates throughout your stock. When the worldwide view function is activated upon reimport, configuration modifications are utilized additionally throughout accounts.

Extra Submit-launch Actions
Submit-launch actions permit you to management and automate actions carried out after your servers have been launched in AWS. You should use predefined or customized post-launch actions.
Utility Migration Service now has 4 further predefined post-launch actions to run in your Amazon EC2 cases on high of the prevailing predefined post-launch actions. These further post-launch actions give you flexibility to maximise your migration expertise.

The brand new 4 further predefined post-launch actions are as follows:
- Configure Time Sync – You should use the Time Sync function to set the time to your Linux occasion utilizing ATSS.
- Validate disk area – You should use the disk area validation function to acquire visibility into the disk area and to make sure that you could have sufficient out there disk area in your goal server.
- Confirm HTTP(S) response – You should use the Confirm HTTP(S) response function to conduct HTTP(S) connectivity checks to a predefined record of URLs. The function verifies the connectivity to the launched goal occasion.
- Allow Amazon Inspector – The Allow Amazon Inspector function lets you run safety scans in your Amazon EC2 assets, together with the goal cases launched by Utility Migration Service. The Amazon Inspector service is enabled on the account stage. This motion makes use of the
Allow,BatchGetAccountStatus,andCreateServiceLinkedRoleAPIs.
Now Out there
The International View, Import and Export Function from Native, and Extra Submit-launch Actions can be found now, and you can begin utilizing them at the moment in all Areas the place AWS Utility Migration Service is supported. Go to the Utility Migration Service Person Information to dive deeper into these thrilling options and you’ll discuss with the Getting began with AWS Utility Migration Service to kickstart your workload migration to AWS.
—Irshad
