
The Jumper T20S Gemini represents an evolutionary step on the earth of radio transmitters, boasting an inner ExpressLRS RF module with twin transmitters. This progressive design facilitates Gemini Mode, a function that units it aside within the present radio market. Nonetheless, my assessments reveal some potential issues with its 1W output. Let’s discover these findings in depth.

New to FPV? You’ll be able to be taught extra about FPV drone radio transmitters on this purchaser’s information: https://oscarliang.com/radio-transmitter/
The place to Purchase?
You should purchase the Jumper T20S Gemini from these distributors:

Design and Construct High quality
Externally, the T20S Gemini mirrors its predecessor, the T20S, by way of design, construct, interface, ergonomics, and RDC90 gimbals. Right here’s a aspect by aspect comparability between these fashions. Word: My T20S has undergone numerous modifications, particulars of which you’ll find right here:

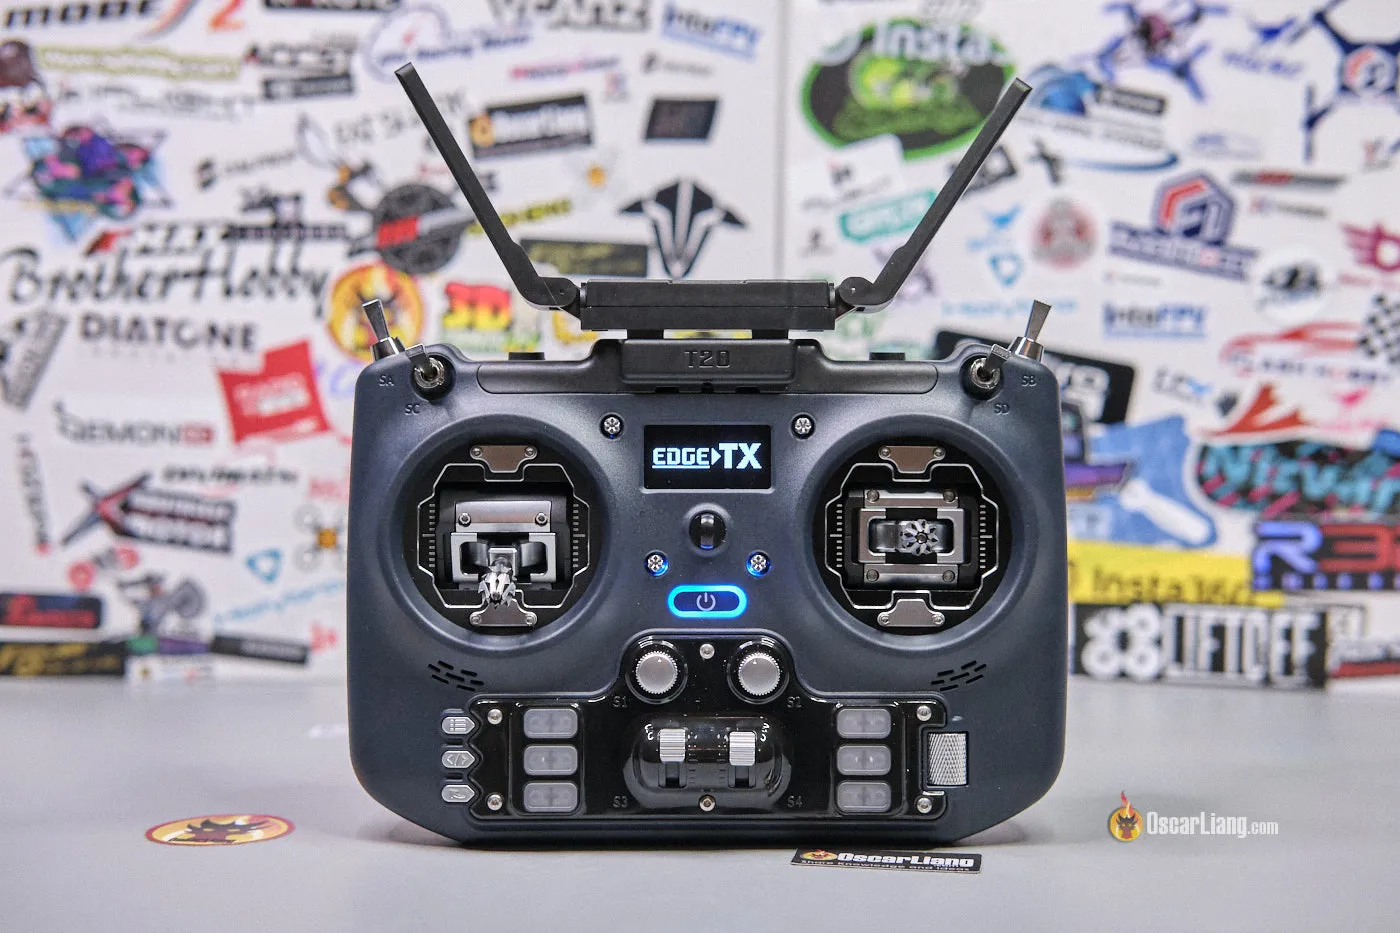
Under are some detailed pictures of the T20S Gemini version.


The important thing distinction is the built-in Gemini Mode transmitter module and its twin folding antennas, designed to be positioned at 90 levels to one another for optimum efficiency.


I’m not going into particulars in regards to the gimbals, switches, consumer interface and ergonomics on this evaluate, since they’re similar to the unique T20S. If you happen to want to know extra take a look at my earlier evaluate: https://oscarliang.com/jumper-t20-radio/. As an alternative, I’ll concentrate on what units this mannequin aside.
Gemini Mode Assist
The standout function of the T20S Gemini version is its Gemini Mode functionality.
Now, if you’re unfamiliar with Gemini Mode, take a look at on this publish: https://oscarliang.com/expresslrs-gemini/. To place it merely, there are 2 transmitters contained in the radio, which is able to transmitting 2 packets concurrently on separate frequencies, growing redundancy and reliability of the radio hyperlink. It doesn’t essentially enhance vary however considerably improve hyperlink high quality particularly in noisy surroundings.
As a result of elevated energy consumption and warmth, it has a cooling fan hooked up to the heatsink on the again. The fan could be very quiet and you may hardly discover it when operating.

With better sophistication comes the next value level and the necessity for suitable “true range” receivers, additional growing the price. Right here’s an instance of “true range” receiver: https://oscarliang.com/expresslrs-diversity-receivers/#BetaFPV-SuperD
For individuals who fly briefly to medium distance and open area, the unique model is greater than sufficient in my view. Nonetheless the Gemini model gives higher radio hyperlink reliability in difficult surroundings.
The T20S Gemini can also be suitable with normal receivers (non range), merely swap to the standard antenna mode within the ExpressLRS LUA script (ANT 1 or ANT 2 modes). To make use of Gemini Mode, merely put Antenna mode to Gemini within the configuration.

Exterior Module Bay
The T20S Gemini won’t include a built-in module bay, however it does help exterior modules. There are screw holes on the cooling fan on the again, particularly designed for putting in a detachable module bay adapter. Nonetheless, take into account that this adapter isn’t included within the bundle and can should be bought individually.
Peeling again the rubber cowl under the cooling fan reveals the XT30 energy output (7.4V 1.5A) and an information port for connecting to an exterior module.

ExpressLRS
The T20S Gemini options an inner ExpressLRS module. You’ll be able to flash its firmware in ExpressLRS Configurator, the firmware goal “Jumper Gemini T-20 2.4GHz TX” is now accurately listed below “System”. Updating the firmware was a breeze for me utilizing the passthrough technique.
A fast tip for these updating: at all times make sure you’re working with the newest LUA script. Seize the latest model, exchange the outdated script in your SD card’s SCRIPT > TOOLS Folder, after which take away the previous recordsdata, i.e. elrsV3.luac and elrsV3.lua.
In case you are new to ExpressLRS, take a look at my detailed setup information: https://oscarliang.com/setup-expresslrs-2-4ghz/
EdgeTX
The Jumper T20S Gemini comes preinstalled with EdgeTX firmware, which is at the moment probably the most broadly used radio firmware within the FPV group.
A notable function in regards to the T20S is its elimination of the SD card slot. And no, it’s not an oversight. In truth, the T20 doesn’t even require an SD card. As an alternative, it boasts an onboard 512MB flash reminiscence. This serves as a storage for what’s usually termed as “SD Content material” the place mannequin photos, audio recordsdata and radio backups are saved. Meaning you gained’t have to buy an SD card individually.
You’ll be able to entry the storage by way of the USB-C port: join the cable whereas the radio is lively, when prompted, choose the USB Storage (SD) choice.
When you seemingly gained’t have to mess with firmware when the radio arrives, it’s actually doable to flash EdgeTX firmware utilizing one of many two strategies described in my tutorial: https://oscarliang.com/flash-edgetx/
Battery
The included battery holder accommodates two 21700 batteries, although it’s doable to suit 18650s. This flexibility is a plus for customers with completely different battery preferences.

Batteries are usually not included, and should be bought individually. Get them right here:
21700 Li-ion cells:
18650 Li-ion cells:
For these utilizing 21700, brace for a decent match. It takes a agency push to shut the battery bay lid. The holder additionally helps 18650, simply pull the contacts outwards with a pair of pliers, to allow them to maintain the smaller 18650 cells securely. I personally want 18650 for its light-weight and general weight stability, even when it trades off some battery longevity.
Energy Consumption and Battery Life
The Gemini’s energy draw varies with the RF energy setting. Right here’s what I noticed:
Gemini Mode:
- 0.40A at 25mW
- 0.59A at 250mW
- 1.12A at 500mW
0.76A at 1W
Ant1 / Ant2 Modes:
- 0.28A at 25mW
- 0.40A at 250mW
- 0.59A at 500mW
0.60A at 1W
The T20S Gemini appears to make use of a bit extra energy than the unique model presumably because of the cooling fan.
Surprisingly, the 1W setting attracts much less present than anticipated. It’s confirmed by my RF output testing, the radio produce solely round 400mW energy at 1W settings, therefore the low present draw (extra particulars in Output Energy Testing part under).
A notable level is the elevated battery consumption in Gemini Mode as a result of powering two transmitters. Customers ought to be ready for a quicker battery drain when utilizing the Gemini Mode.
Right here’s a tough estimation of battery life:
- In Gemini Mode, utilizing 21700 4500mAh cells, you possibly can anticipate round 12 hours of run time at 10mW, or roughly 4 hours at 500mW. With 18650 3000mAh cells, this drops to roughly 8 hours at 10mW or about 2.5 hours at 500mW.
- In Ant 1 or Ant 2 modes, utilizing 21700 4500mAh cells, you possibly can anticipate round 14 hours of run time at 10mW, or roughly 7 hours at 500mW. With 18650 3000mAh cells, this drops to roughly 9 hours at 10mW or about 4.5 hours at 500mW.
To optimize battery life, you possibly can make the most of the Dynamic Energy choice out there within the ExpressLRS LUA script. With Dynamic Energy, the mW output adapts to the mannequin’s vary, sign energy and hyperlink high quality, minimizing energy consumption. This function permits for as little as 10-25mW utilization throughout unobstructed line-of-sight flights.
Charging
Other than information connection, the USB-C port positioned on prime can also be used for battery charging.

One of many downsides of the T20S Gemini is its sluggish charging. PD chargers don’t appear to work correctly, and it solely help regular 5V chargers. Consequently, its cost charge is a modest 4W, dropping even decrease because the battery nears full cost.
Estimated charging occasions are as follows:
- 21700 4500mah batteries: Roughly 9 hours
- 18650 3000mah batteries: Slightly below 6 hours
Taking part in Simulators
The Jumper T20S Gemini is plug and play with common FPV simulators akin to Tryp and Liftoff. When related, it’s robotically acknowledged within the simulator and reveals up as “Radiomaster TX16S”. Whereas it’s the unsuitable mannequin, it doesn’t have an effect on utilization, and the setup stays the identical as all different mainstream remotes.
Tear Down
Disassembling the Jumper T20S Gemini may be considerably cumbersome as there are a lot of screws includes. To begin, gently pry out the rubber inserts on the again. Then, unscrew the ten screws which maintain the back and front housing collectively. Don’t neglect to loosen the 2 prime switches throughout this course of.

Be cautious of the three cables connecting the back and front housing, which must be unplugged first earlier than pulling the radio aside.

All of the switches are related to the mainboard utilizing cables. This design selection simplifies any restore or replacements you would possibly have to do down the street.

The construct high quality and inner designs are largely just like the unique T20, aside type the PCB colour (was inexperienced however now black), and the RF module boards.

Output Energy Testing
Listed below are the ability measurements of the Jumper T20S Gemini’s inner module at completely different output energy ranges. These measurements have been taken utilizing the ImmersionRC Energy meter V2.
Gemini Mode
| Energy Ranges | 25mW | 50mW | 100mW | 250mW | 500mW | 1W |
| T20S Inside Module | 21mW | 47mW | 86mW | 211mW | 462mW | 404mW |
Antenna 1
| Energy Ranges | 25mW | 50mW | 100mW | 250mW | 500mW | 1W |
| T20S Inside Module | 21mW | 45mW | 85mW | 208mW | 450mW | 490mW |
Antenna 2
| Energy Ranges | 25mW | 50mW | 100mW | 250mW | 500mW | 1W |
| T20S Inside Module | 25mW | 55mW | 101mW | 233mW | 482mW | 425mW |
Curiously, at 1W, the output is round 400-500mW. I repeated the check 3 occasions, tried completely different ExpressLRS configurations, and in addition tried larger enter voltage, related outcomes. Might this point out a flawed inner RF module, or am I simply unfortunate with a foul unit? Anyway, 500mW appears to be extra promising, so I examined it additional for consistency.

After a 20-minute check at 500mW in Gemini mode, the output stabilized at round 450mW. The cooling fan appears to be efficient in holding the module cool. I’d most likely keep away from utilizing 1W setting with my T20S Gemini radio, and keep on with 500mW.
Find out how to Setup
I’ve a tutorial on learn how to setup the T20S from scratch: https://oscarliang.com/setup-jumper-t20s-radio/
Conclusion

Gemini Mode is especially well-suited for pilots who function in RF-noisy environments or require a extremely dependable hyperlink for his or her flights. Its attraction extends to each hobbyists and professionals who would possibly expertise interference points with normal transmitters.
You should purchase the Jumper T20S Gemini from these distributors:
Jumper is the primary to launch a radio with built-in Gemini suitable module. Whereas their pioneering effort is commendable, there appears to be points with the 1W output – whether or not a singular defect or a broader high quality management drawback – is a priority. Happily, the 500mW efficiency appears to be strong in my testing, providing a dependable various for many customers.
If you happen to want to run Gemini at 1W output energy, at the moment your finest guess is the BetaFPV SuperG module which I’ve reviewed: https://oscarliang.com/betafpv-superg-nano-transmitter-module/
If you happen to want to run 1W settings with out Gemini Mode, get the unique T20S, which can also be cheaper: https://oscarliang.com/jumper-t20-radio/
