
Amazon Redshift is probably the most extensively used knowledge warehouse within the cloud, finest fitted to analyzing exabytes of information and operating advanced analytical queries. Amazon QuickSight is a quick enterprise analytics service to construct visualizations, carry out advert hoc evaluation, and shortly get enterprise insights out of your knowledge. QuickSight offers simple integration with Amazon Redshift, offering native entry to all of your knowledge and enabling organizations to scale their enterprise analytics capabilities to lots of of 1000’s of customers. QuickSight delivers quick and responsive question efficiency through the use of a sturdy in-memory engine (SPICE).
As a QuickSight administrator, you need to use AWS CloudFormation templates emigrate property between distinct environments from growth, to check, to manufacturing. AWS CloudFormation helps you mannequin and arrange your AWS assets so you may spend much less time managing these assets and extra time focusing in your purposes that run in AWS. You not must create knowledge sources or analyses manually. You create a template that describes all of the AWS assets that you really want, and AWS CloudFormation takes care of provisioning and configuring these assets for you. As well as, with versioning, you’ve your earlier property, which offers the pliability to roll again deployments if the necessity arises. For extra particulars, check with Amazon QuickSight useful resource kind reference.
On this submit, we present find out how to automate the deployment of a QuickSight evaluation connecting to an Amazon Redshift knowledge warehouse with a CloudFormation template.
Answer overview
Our resolution consists of the next steps:
- Create a QuickSight evaluation utilizing an Amazon Redshift knowledge supply.
- Create a QuickSight template to your evaluation.
- Create a CloudFormation template to your evaluation utilizing the AWS Command Line Interface (AWS CLI).
- Use the generated CloudFormation template to deploy a QuickSight evaluation to a goal setting.
The next diagram exhibits the structure of how one can have a number of AWS accounts, every with its personal QuickSight setting linked to its personal Amazon Redshift knowledge supply. On this submit, we define the steps concerned in migrating QuickSight property within the dev account to the prod account. For this submit, we use Amazon Redshift as the information supply and create a QuickSight visualization utilizing the Amazon Redshift pattern TICKIT database.

The next diagram illustrates movement of the high-level steps.

Conditions
Earlier than establishing the CloudFormation stacks, it’s essential to have an AWS account and an AWS Id and Entry Administration (IAM) consumer with adequate permissions to work together with the AWS Administration Console and the providers listed within the structure.
The migration requires the next stipulations:
Create a QuickSight evaluation in your dev setting
On this part, we stroll by means of the steps to arrange your QuickSight evaluation utilizing an Amazon Redshift knowledge supply.
Create an Amazon Redshift knowledge supply
To hook up with your Amazon Redshift knowledge warehouse, you could create an information supply in QuickSight. As proven within the following screenshot, you’ve two choices:
- Auto-discovered
- Handbook join

QuickSight auto-discovers Amazon Redshift clusters which can be related along with your AWS account. These assets have to be positioned in the identical Area as your QuickSight account.
For extra particulars, check with Authorizing connections from Amazon QuickSight to Amazon Redshift clusters.
You can even manually join and create an information supply.

Create an Amazon Redshift dataset
The following step is to create a QuickSight dataset, which identifies the precise knowledge in an information supply you wish to use.
For this submit, we use the TICKIT database created in an Amazon Redshift knowledge warehouse, which consists of seven tables: two reality tables and 5 dimensions, as proven within the following determine.

This pattern database utility helps analysts observe gross sales exercise for the fictional TICKIT web site, the place customers purchase and promote tickets on-line for sporting occasions, exhibits, and concert events.
- On the Datasets web page, select New dataset.
- Select the information supply you created within the earlier step.
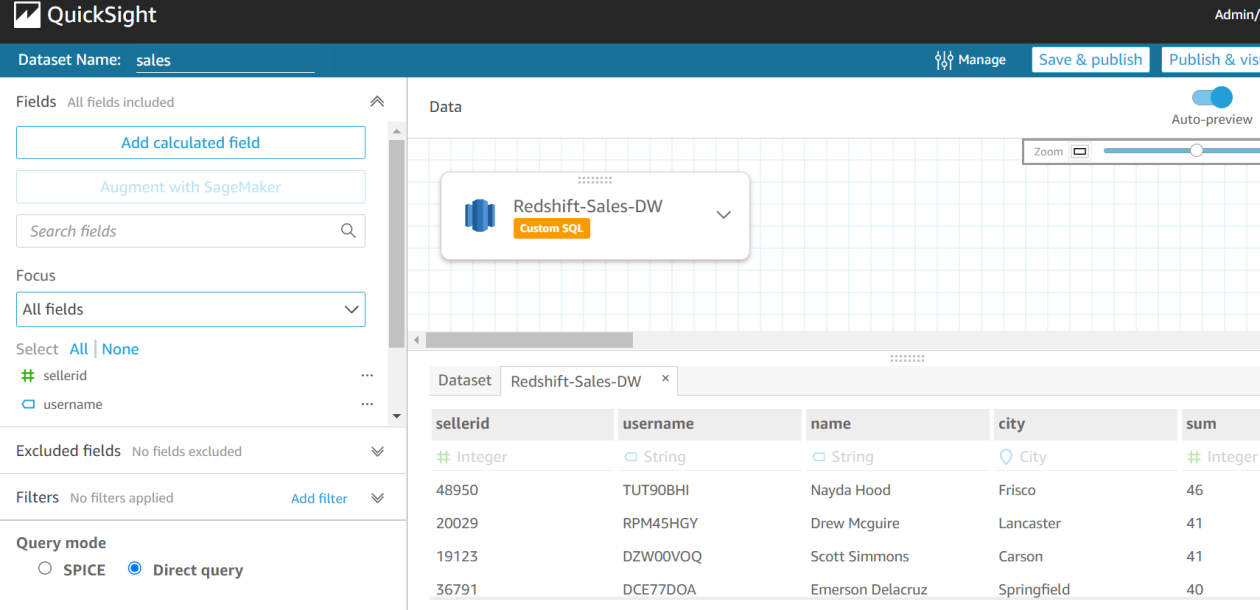
- Select Use customized SQL.
- Enter the customized SQL as proven within the following screenshot.
 |
 |
The next screenshot exhibits our accomplished knowledge supply.

Create a QuickSight evaluation
The following step is to create an evaluation that makes use of this dataset. In QuickSight, you analyze and visualize your knowledge in analyses. Whenever you’re completed, you may publish your evaluation as a dashboard to share with others in your group.
- On the All analyses tab of the QuickSight begin web page, select New evaluation.

The Datasets web page opens.
- Select a dataset, then select Use in evaluation.

- Create a visible. For extra details about creating visuals, see Including visuals to Amazon QuickSight analyses.

Create a QuickSight template out of your evaluation
A QuickSight template is a named object in your AWS account that incorporates the definition of your evaluation and references to the datasets used. You possibly can create a template utilizing the QuickSight API by offering the main points of the supply evaluation through a parameter file. You should utilize templates to simply create a brand new evaluation.
You should utilize AWS Cloud9 from the console to run AWS CLI instructions.

The next AWS CLI command demonstrates find out how to create a QuickSight template based mostly on the gross sales evaluation you created (present your AWS account ID to your dev account):
The parameter.json file incorporates the next particulars (present your supply QuickSight consumer ARN, evaluation ARN, and dataset ARN):
You should utilize the AWS CLI describe-user, describe_analysis, and describe_dataset instructions to get the required ARNs.
To add the up to date parameter.json file to AWS Cloud9, select File from the instrument bar and select Add native file.

The QuickSight template is created within the background. QuickSight templates aren’t seen throughout the QuickSight UI; they’re a developer-managed or admin-managed asset that’s solely accessible through the AWS CLI or APIs.
To examine the standing of the template, run the describe-template command:
The next code exhibits command output:

Copy the template ARN; we’d like it later to create a template within the manufacturing account.
The QuickSight template permissions within the dev account should be up to date to present entry to the prod account. Run the next command to replace the QuickSight template. This offers the describe privilege to the goal account to extract particulars of the template from the supply account:
The file TemplatePermission.json incorporates the next particulars (present your goal AWS account ID):
To add the up to date TemplatePermission.json file to AWS Cloud9, select the File menu from the instrument bar and select Add native file.
Create a CloudFormation template
On this part, we create a CloudFormation template containing our QuickSight property. On this instance, we use a YAML formatted template saved on our native machine. We replace the next completely different sections of the template:
- AWS::QuickSight::DataSource
- AWS::QuickSight::DataSet
- AWS::QuickSight::Template
- AWS::QuickSight::Evaluation
A few of the data required to finish the CloudFormation template may be gathered from the supply QuickSight account through the describe AWS CLI instructions, and a few data must be up to date for the goal account.
Create an Amazon Redshift knowledge supply in AWS CloudFormation
On this step, we add the AWS::QuickSight::DataSource part of the CloudFormation template.
Collect the next data on the Amazon Redshift cluster within the goal AWS account (manufacturing setting):
- VPC connection ARN
- Host
- Port
- Database
- Person
- Password
- Cluster ID
You have got the choice to create a customized DataSourceID. This ID is exclusive per Area for every AWS account.
Add the next data to the template:
Create an Amazon Redshift dataset in AWS CloudFormation
On this step, we add the AWS::QuickSight::DataSet part within the CloudFormation template to match the dataset definition from the supply account.
Collect the dataset particulars and run the list-data-sets command to get all datasets from the supply account (present your supply dev account ID):
The next code is the output:

Run the describe-data-set command, specifying the dataset ID from the earlier command’s response:
The next code exhibits partial output:

Primarily based on the dataset description, add the AWS::Quicksight::DataSet useful resource within the CloudFormation template, as proven within the following code. Word which you can additionally create a customized DataSetID. This ID is exclusive per Area for every AWS account.
You possibly can specify ImportMode to decide on between Direct_Query or Spice.
Create a QuickSight template in AWS CloudFormation
On this step, we add the AWS::QuickSight::Template part within the CloudFormation template, representing the evaluation template.
Use the supply template ARN you created earlier and add the AWS::Quicksight::Template useful resource within the CloudFormation template:
Create a QuickSight evaluation
On this final step, we add the AWS::QuickSight::Evaluation part within the CloudFormation template. The evaluation is linked to the template created within the goal account.
Add the AWS::Quicksight::Evaluation useful resource within the CloudFormation template as proven within the following code:
Deploy the CloudFormation template within the manufacturing account
To create a brand new CloudFormation stack that makes use of the previous template through the AWS CloudFormation console, full the next steps:
- On the AWS CloudFormation console, select Create Stack.
- On the drop-down menu, select with new assets (normal).
- For Put together template, choose Template is prepared.
- For Specify template, select Add a template file.
- Save the supplied CloudFormation template in a .yaml file and add it.
- Select Subsequent.
- Enter a reputation for the stack. For this submit, we use
QS-RS-CF-Stack. - Select Subsequent.
- Select Subsequent once more.
- Select Create Stack.

The standing of the stack modifications to CREATE_IN_PROGRESS, then to CREATE_COMPLETE.

Confirm the QuickSight objects within the following desk have been created within the manufacturing setting.
| QuickSight Object Sort | Object Title (Dev) | Object Title ( Prod) |
| Information Supply | RS-Gross sales-DW | RS-Gross sales-DW |
| Dataset | Gross sales | Gross sales |
| Template | QS-RS-Gross sales-Temp | QS-RS-SalesAnalysis-Temp |
| Evaluation | Gross sales Evaluation | Gross sales-Evaluation |
The next instance exhibits that Gross sales Evaluation was created within the goal account.

Conclusion
This submit demonstrated an method emigrate a QuickSight evaluation with an Amazon Redshift knowledge supply from one QuickSight account to a different with a CloudFormation template.
For extra details about automating dashboard deployment, customizing entry to the QuickSight console, configuring for staff collaboration, and implementing multi-tenancy and consumer consumer segregation, try the movies Digital Admin Workshop: Working with Amazon QuickSight APIs and Admin Stage-Up Digital Workshop, V2 on YouTube.
In regards to the writer
 Sandeep Bajwa is a Sr. Analytics Specialist based mostly out of Northern Virginia, specialised within the design and implementation of analytics and knowledge lake options.
